Wednesday, November 30, 2011

Mrs. Fields (that would be me) Cookies

Our favorite cookie recipe came to me back in the 80's over a fax machine. A lady had tried to buy THE "Mrs. Fields" cookie recipe and was charged $200 instead of the $2 she thought they were charging. They would not refund her money and so the recipe was faxed out to anyone and everyone she knew. So I was the beneficiary of one of these faxes. Below is my modified version of this recipe. I divided it into 1/2, 3/4 or whole recipe because the whole makes sooooo many cookies. Normally I make the 1/2 batch for just family time.Make sure you use Real butter, margarine totally changes the taste & consistency of the cookie.

Click recipe to enlarge


We made these last night and used 1 bag of Semi sweet & 1 bag of white chocolate chips. They turned out very good. A great variation would be to add to the flour mixture 1 cup cocoa powder for chocolate chocolate chip cookies!

My assistant Baker Ava!

Monday, November 28, 2011

Sheri's Pan Grilled Salmon

I think my favorite thing to eat is Salmon. I love it pretty much any way you fix it. There are different kinds of salmon. Atlantic & Sockeye seem to be the most prevalent in stores I have been in. I tend to prefer the Atlantic when sauteing. Sockeye is great on a cedar plank on the grill. But it is a healthy & delicious fish. (My husband won't eat it because it's pink! That is so his loss!) Here is a link with some great info on purchasing & the different types of salmon: http://www.virtualweberbullet.com/salmonselect.html

 Sheri's Pan Grilled Salmon

1 lb Atlantic Salmon (sear the skin side first for easy removal)
Olive Oil
Real butter
Minced garlic to taste
Garlic powder
Seasoned Salt
Optional: ground rosemary

Heat the olive oil in your skillet over medium heat; add one pat of butter & Tbsp of minced garlic; place salmon skin side down in the skillet for about 45 seconds just to sear the skin; while heating season the top side with garlic powder, seasoned salt & rosemary; turn the salmon; with a fork peel off the skin, discard and season this side; the searing time on each side is dependant on how done you like your salmon (I love mine to be almost rare in the middle) sear for 2 min on each side cover and remove from heat; let stand for a minute; You can cook it longer on each side if you want it well done.

Serve with your favorite side - Uncle Ben's Brown & Wild Rice*, Caesar salad or some roasted veggies are my favorite. *These are the orange packets they sell in the rice section and they microwave in 90 seconds & are delicious!


This makes for a nice departure from all the heavy food consumed during the holidays or just anytime.

ENJOY!!!

Sunday, November 27, 2011

Ideas for YOUR Christmas List!

My KitchenAid is my most prized kitchen gadget. . .While browsing around on their website I found their Outlet area. . .great deals on refurbished stand mixers & food choppers.


http://www.shopkitchenaid.com/more-ways-to-shop-1/outlet-2/factory-refurbished-3/102020034/

For even more ideas I was at Burlington Coat Factory and they had these amazing KitcheAid fun kitchen gadgets at really reasonable prices. So, if you want or know someone that loves cooking you can get great quality stocking stuffers there & also check out TJ Maxx & Ross. They usually carry upper end gadgets at better than the bargain shop prices!

Friday, November 25, 2011

Happy Thanksgiving Weekend!

I hope you were all with friends & or family yesterday! After a crazy day before T-Day of running my youngest granddaughter to the Emergency Room for stuffing a spongy keyboard piece up her nose, I didn't get started baking until it was dark out! But thankfully she is ok.

For The big day we had our daughter & her fam over & then friends came over for the second round of food and our holiday kick-off tradition of watching "Christmas Vacation"! Had a great day! I think breakfast was the biggest hit of the day. . .
I have to admit they were really good. The best part was I prepped them the day before from dough I had in the freezer, letting them rise while I was baking pies & such, covered & placed in fridge over night. Popped them in the oven first thing Thanksgiving morning and we had a very yummy breakfast that was quick & actually easy.

Our Thanksgiving Feast was fun & good. I love cooking with my daughter, it makes me happy! Instead of one person taking the brunt of everything we split the shopping & cooking duties in half & brought it all together for a wonderful meal. We enjoy just being together so that makes it even more fun!

Well it's Black Friday, so if you have been out there shopping, more power to you! I avoid BF at all cost. I have seen alot of sales on some great kitchen gadgets, but even that is not enough to drag me out! LOL

Saturday, November 19, 2011

Italian Stromboli

Stromboli is a great alternative to Pizza. . .you can fill it with pretty much any of your fav sub/sandwich ingredients. I made this one like the Italian BMT sub we love.


Ingredients:
1/2 pizza dough recipe or 1 mound from store or freezer
1 - 2 Tbs olive oil
 10 - 12 Sliced Hard Salami,
1 bag reg Pepperoni or large sliced
6-8 sliced Smoked Ham
8-10 slices provolone cheese
Add these to your liking:
Banana peppers
chopped jalapenos
diced onions, etc.

Pre-heat oven to 400; Place stone* in oven to heat; Roll out pizza dough to large rectangle (don't roll it too thin or it will fall apart when rolling it up). brush lightly with olive oil; in rows layer the meat so that is covers the dough - minus 1 inch along the long edge of the rectangle; layer cheese over the meat; then add your toppings; roll the dough long ways and seal edges; make small slits along top of Stromboli to vent steam; Bake for 25-30 minutes.

*baking on a pre-heated stone makes the bottom crispy!

I recommend using a stone, but you can also use a cookie sheet with a raised edge. don't use a flat cookie sheet as the oils may drip out onto your oven.

For a healthier recipe: use whole wheat dough and Turkey Pepperoni (the turkey pepperoni is less greasy and actually cooks up better than the regular pepperoni).

Thursday, November 17, 2011

Pumpkin Bread

Guess I am on a "Bread" roll. . .LOL. But the Holidays always get me in the mood for yummy breads and all kinds of comfort food. This recipe is actually a modified Banana bread recipe that is very moist and custard like in consistency. (My friend that hates bananas would say Thank you!) It is really yummy sweet bread.

Pumpkin Bread

1/2 to 1 Quart of cooked pumpkin (mashed)
3/4 c each of white & brown sugar
2 eggs
1 1/2 sticks of real butter softened
1 1/4 cup milk warmed
2 Tbs cinnamon
1 tsp ginger
2 c self rising flour
1 Tbs Vanilla

Pre-heat oven to 350 degrees; Cream butter & sugar together; mix in pumpkin and remaining ingredients in order given; grease (or spray) 2 loaf pans;  divide evenly into loaf pans and bake for 45 min - 1 hour;

After removing from oven loosen from pan and allow to cool on wire racks if you can keep your family away from it that long! You can also use Mini loaf pans and use as gifts during the holiday season. If you like banana bread just substitute the pumpkin for 3 medium ripe bananas smashed.

Wednesday, November 16, 2011

Waffles!!!

Great Holiday Breakfast idea! BACON WAFFLES!

I will confess, I tried my hand at a scratch recipe for waffles & they weren't that great, taste was ok, but they were very heavy. So I recommend using Krusteaz Belgian Waffle mix (it is fantastic & easy!)

For Bacon Waffles -
Cook 2-3 peices bacon per waffle
(Thick sliced applewood smoked bacon is best - more flavor);
Chop bacon into small bite size or smaller peices;
Preheat waffle iron;
Prepare waffle mix as directed on box;
Drop bacon pcs on heated waffle iron right before pouring batter;
Pour batter over bacon, close lid;
Cook as you normally would on your waffle iron;

DELISH!!


"Creating Smiles One Recipe at a Time!"

Tuesday, November 15, 2011

Homemade Macaroni & Cheese!

For the upcoming holidays or just a wonderful warm side dish, try this baked macaroni & cheese. It is one of my favorites (and I don't like macaroni & cheese - mainly because I had to make it every night while my kids were little it was their fav!). For a healthier twist use whole wheat pasta! It is wonderful. Do not omit the dried mustard as it add a special zing to the recipe.
Ingredients

8 oz. macaroni
1 tsp. butter
1 egg, beaten
3 Cups grated sharp cheese
1 tsp. dry mustard
1 tsp. salt
1 Tbsp. hot water
1 cup milk


Equipment

Large stock pot
Mixing bowl
Wooden spoon
Pyrex casserole dish
Measuring spoons and cups


Instructions:
1. Cook macaroni in boiling water until tender; drain thoroughly.
2. Stir in butter and egg. Add cheese, reserving enough to sprinkle on top. Pour into buttered casserole.
3. Mix mustard and salt with hot water and add to milk. Pour over macaroni; sprinkle with remaining cheese. Bake at 350 degrees for about 45 minutes or until custard is set and top is crusty.

"Creating Smiles One Recipe at a Time!"

Sunday, November 13, 2011

Great Links

To finish up on our sourdough fun, I was doing more research and surfing different websites. Below are a few good links. One for a free starter! Sourdough home has some great info on sourdough from an experienced baker. They sent me to the second link to get a free starter! Happy reading!

http://www.sourdoughhome.com/index.html

http://carlsfriends.net/

Saturday, November 12, 2011

Variations With Pizza Dough Recipe

Using the recipe below for the Pizza dough you can also make stromboli. Roll it out into a rectangle layer cheese, pepperoni, salami, ham & sprinkle with cider vinegar; roll up fillings into the dough (like a jelly roll) fold under & pinch the ends; make small slits in the top to vent steam; Bake @ 375 on a stone for 30-45 minutes.

Or

Cinnamon Rolls: Modify the dough recipe using Canola oil instead of olive oil & adding 1/4 cup sugar. roll out into rectangle brush with melted real butter sprinkle with brown sugar & cinnamon (heavy or light depending on your taste). Roll up dough same as above; using a length of thread slip it under the dough roll and at 1 inch intervals wrap the thread around the dough roll and pull croswise; this will cut the cinnamon rolls into perfect circles. Place on stone or baking sheet and bake for 15-20 minutes until brown & bubbly. Brush with melted butter prior to baking for even more flavor!


Friday, November 11, 2011

Bonus: Family Pizza Night!

I just love having my grand kids in the kitchen "helping" me cook. I think they may love it more than I do. So, instead of ordering Pizza from the local pizza shop, have a "Homemade Pizza Night"! Homemade pizza dough is so much better and if you have a stand alone mixer with a dough hook it is really quite simple to make! So, gather the family and have everyone make their own favorite personal pizza. Or make one large pizza and let the kids each make their own smaller ones. It is fun!

click on recipe so you can actually read it!
Depending on your kids attention span* you can pre-make the dough (an hour or even a day earlier) and have it standing by after they help you 'make' the dough. You can feel like a Food Network Star and bring out the dough that is ready when you set the other up to rise! This dough freezes very well, I split it out into 4 mounds and freeze them in zip lock freezer bags great for using on a night you want pizza quickly. *You can also buy pre-made pizza dough in the bakery/deli area of most grocery stores or the freezer section near the biscuits.

Whole Wheat Pizza Dough is my favorite! I modified this recipe using 2 cups Whole Wheat Flour & 1 cup All Purpose Flour.  also adding 1/2 Tbs more Olive Oil & while it is kneading in the mixer I added warm water a little at a time as needed if it was real crumbly.
These are my granddaughters on our pizza night last night.
My youngest granddaughter is almost 2, I gave her some dough to 'make' her pizza and it made her so happy! As you can see it wasn't much but she loved rolling it out. This is great way to instill the love of cooking in children that will carry on when they become parents.

You can purchase kid size rolling pins at TJ Maxx or Ross cheaply or at any kitchen store (that is going to be my next purchase).

Hope this helps give you an idea for bringing the family together, especially with the holidays coming up soon and all through the year!
Jalapeno Chicken Pizza! My son-in-laws Fav.

  "Creating Smiles One Recipe at a Time!"

Using Your Sourdough Starter

Now comes the fun part! Making Bread!! Give yourself plenty of time for this phase (it is well worth the wait!) You will need some cloths (that are not fuzzy) to cover your dough while it is rising. I use kitchen washcloths that are dedicated to this only. If your kitchen is drafty you may want to warm your oven prior to starting the dough then turn it off and when ready place your rising dough in a glass bowl, in the oven covered with the door shut & light on.

This is the recipe I chose to begin with and what is pictured below http://allrecipes.com/recipe/san-francisco-sourdough-bread/detail.aspx
this is one I am going to try soon: http://allrecipes.com/recipe/sourdough-bread-i/detail.aspx

The three phases your dough will go through. Yummy!
Following this recipe is fairly easy, it made 2 loaves & 2 small bread mounds. The only thing I would caution you on is during the second rising time. . . make sure you let it rise in the pan you will be baking it in and allow room for it to double in size without being disturbed. My second go round with this recipe I decided to 'disturb' one of my loaves because it was crowded in the pan (big mistake!) it flattened and never recovered (see below). Thankfully it still tasted good.

My disturbed loaf! turned out to be a great sandwich roll!
Recipe also calls for an egg wash. . .beat the one egg called for in recipe with 1 Tbs of water then lightly brush over top of each loaf. that gives it this beautiful coloring on the crust! I omitted the onions.

You can be creative and use spring form pan for a bread mound or free form the loaves (a bit trickier). My favorite is to bake it in a stone loaf pan or on a round stone with the outer edge of a spring form pan sitting around it to form during the second rising & keep that beautiful round look while baking.

My family & friends have been so happy since I started this. . .they are eating well!

So, happy baking! Feel free to ask me if you have questions. I'll answer or find the answer if I don't know it.

  "Creating Smiles One Recipe at a Time!"

Thursday, November 10, 2011

My new Stone is here!!!

I had to share this excitement!! A Stone is a "Must Have" item in your kitchen! I had a well seasoned stone just like this, but somehow went missing in one of our moves. This is a large Bar pan from Pampered Chef and it is a multi-purpose baking sheet. I used my old one pretty much daily.
I love the way stones give you this wonderful crispiness when baking.

Sharetime: What is your favorite item in your kitchen?

The Art of Breadmaking

Seriously, who doesn't love bread? It is one of my favorite things to eat & now make. It is easier to go to the store or bakery and buy a loaf of bread, but you never get that wonderful aroma of baking bread or the warm taste of a fresh slice of bread right out of the oven! (mmm may have to go get a slice right now!)

I grew up in Northern California and I always loved going to San Fran & ordering some of fresh Sourdough bread on the wharf. There is nothing quite like that whole experience. We have moved around a lot and some places you just can't find a good sourdough bread. Also a little side note to this is the "Southbeach" way of eating (as in no white flour) sourdough is acceptable! That was music to my ears when I read that.
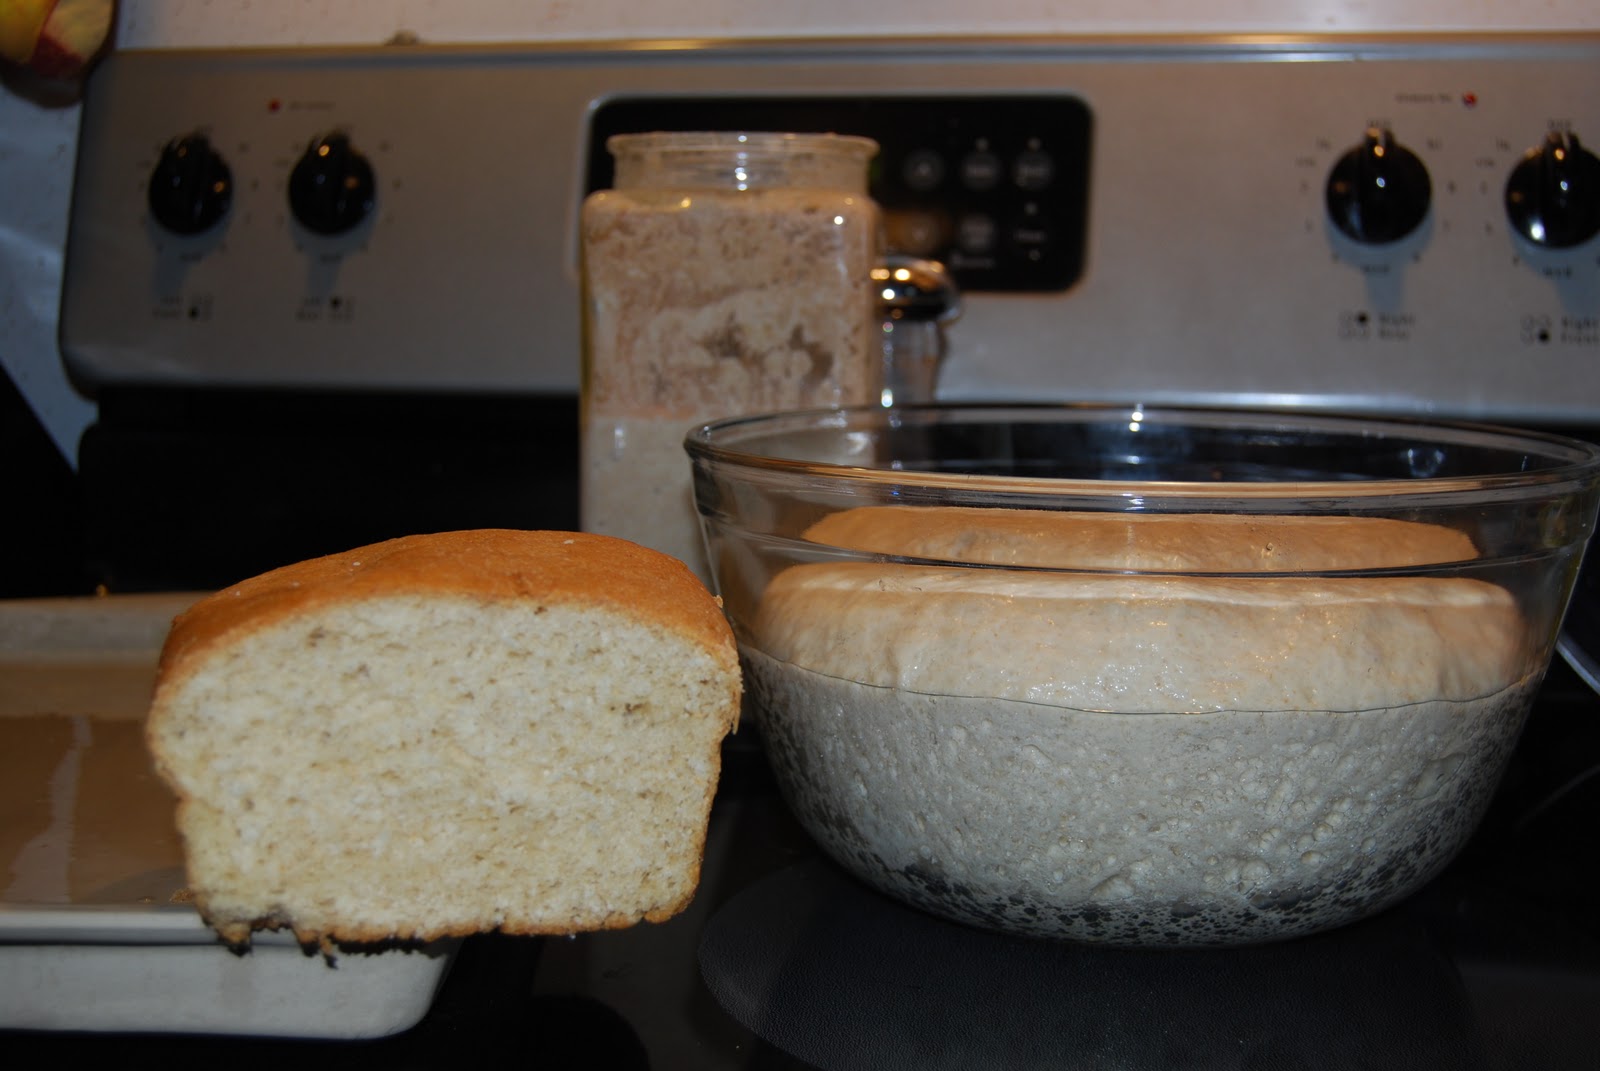
Isn't this just beautiful!
Sourdough rising (starter in background)

My journey begins with finding a good recipe for sourdough bread. My first stop was the baking isle perusing the bread mixes. I do not own a bread machine and that is what most of those are for. Then I spotted it. . .'Krusteaz' makes a boxed sourdough bread kit! I just had to try it. The bread mound above is from that kit and it was delicious! I will recommend this as a good alternative if you are not into all it takes to make SD bread from scratch, but want some great bread. There is still rising time involved but it was pretty simple. Honestly, I am all about simple when life is busy.

Side note: Krusteaz makes quite a few mixes that I have really enjoyed. So far I have only found them at Walmart. You may have better luck where you are. www.krusteaz.com


Now for the adventurous spirit. . .sourdough is definitely an art! In researching recipes I found that in making sourdough you must have a 'starter'. The fermenting in the starter is what makes that wonderful tangy taste in sourdough. There are so many starter recipes out there, that I just had to choose one and start from there. http://allrecipes.com/recipe/sourdough-starter-ii/detail.aspx

Beginning with this recipe and after reading more on the reviews/tips I modified it just a bit. I used whole wheat flour instead of regular flour, they recommended this as a better fermenting agent. So, get out your glass bowls, purchase a wooden spoon (unless you have one), and dig in. Note: when working with whole wheat flour more liquid is required, so be aware of that if your starter seems too thick add warm water a little at a time. It should resemble a pancake batter with lots of bubbles.  Keeping it in a warm place helps keep it going as well.

My starter is now 3 days old (pictured above with the rising dough) and doing very well. Make sure you start with a large glass bowl as this will need room to expand then after the 48 hours you can transfer it to a smaller glass container. (I bought one for $5 at Ross, they have great kitchen gadgets at great prices). Stir your starter 2 times a day, feed it once a week or replace ingredients after using some of the starter. If it begins to look flat, add a spoonful of sugar and stir it in. This starter is ready after sitting overnight, even better after 48 hours, but the longer you let it ferment the better the sourdough taste will be. Do not use any metal when making or stirring your starter.

Tomorrow we will use the starter in a recipe!

  "Creating smiles one recipe at a time!"  

Wednesday, November 9, 2011

Welcome to The Lost Art of Cooking. . .

In the busyness of life (working, school, working, families, sports, working, church) we seem to have lost the art of cooking and baking. I think I was hit with this the first time when I was an instructor at a Children's cooking school. Probably one of my favorite jobs EVER! Mainly because I love to create wonderful dishes, breads, desserts & try new things. But I digress. . .the moms of the kids in my cooking classes seemed as excited to learn the art of cooking/baking as their children were.

So, with a bit of time on my hands and a renewed excitement for cooking/baking, I am setting out on this journey and want to share it with you. This is will be a hands on blog of what I am making flops & all. I will give tips and answer any questions you may have. I wish I could share the smells that will come from the stove & oven, but that is where you will get to join in and see for yourself how wonderful it is!

Here's to reviving something that makes everyone smile & say Mmmmmm!


Hopefully through this, the love of creating in the kitchen will be renewed in all of us!